
Help People and directory
Connect Microsoft Entra ID
On this page
Purpose
This guide explains how to allow Bexxo to read your users and groups in Microsoft Entra ID (formerly Azure AD), so that your access to PhishTrainer and Academy stays synchronised automatically: account creation, updates to groups and members, and automatic sending of access emails to administrators. Once set up, you no longer have any manual import to perform.
The whole procedure takes place in your Microsoft Entra environment. At the end, you send a few pieces of information to Bexxo: Bexxo enters this information into the platform and activates the synchronisation.
About the screenshots: the images show the portal in French (as an example). The English labels of the menus and buttons are given in the text; in your portal they appear in the language you have configured.
Prerequisite: an account that, in Microsoft Entra ID, has the permissions to create a group, create an app registration and grant admin consent (Global Administrator role, or the equivalent roles).
Read-only access. The permissions requested below only allow reading your users and groups. Bexxo can never modify, create or delete anything in your Entra ID directory.
1Create the synchronisation group
You decide exactly who is synchronised with Bexxo by using a group: only the members of this group are synchronised, and the rest of your directory is ignored. You can create a single group, or several (for example one group per service).
- In the Microsoft Entra admin center (entra.microsoft.com), go to Entra ID › Groups › All groups, then click New group.
- Group type: Security.
- Group name: a recognisable name, for example
Bexxo - Sync(orPhishTrainer - Sync,Academy - Syncif you distinguish the services). - Membership type: Assigned (you add the members manually).
- Under Members, add the people to synchronise with Bexxo, then create the group.
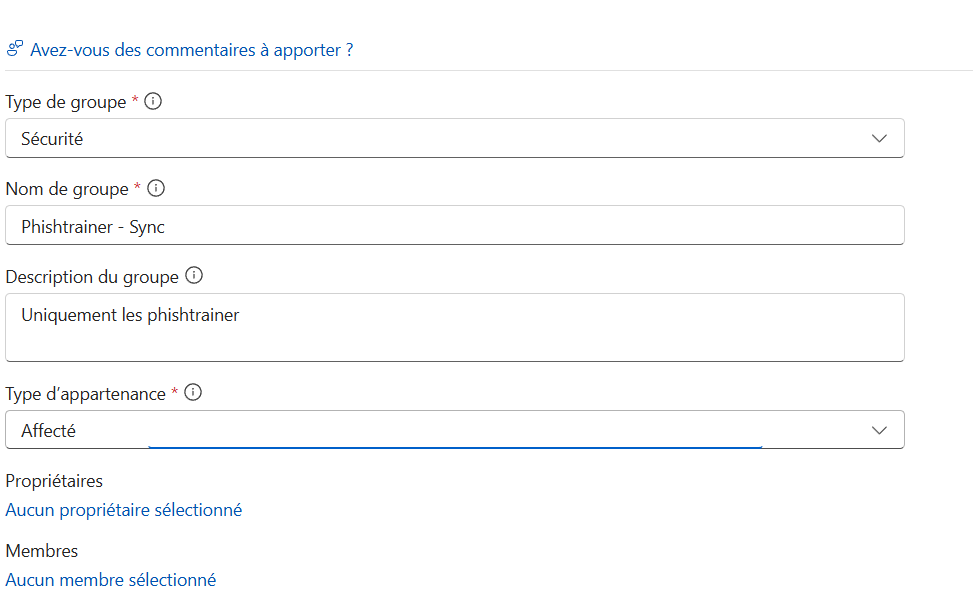
Note the exact name of the group(s) you created: you will pass it to Bexxo in step 6. Afterwards, adding or removing a person from this group is enough to include or exclude them from the synchronisation.
2Create the app registration
The app registration is the “technical account” that Bexxo will use to read your directory, without ever using a real user account.
- In the Microsoft Entra admin center, go to Entra ID › App registrations, then click New registration.
- Name: for example
Bexxo - Directory synchronisation. - Supported account types: choose the single-tenant option recommended by Microsoft, Single tenant only (labelled Accounts in this organizational directory only in earlier versions of the portal).
- Leave the Redirect URI field empty, then click Register.
3Record the Application ID and the Tenant ID
Right after registration, the application's Overview page shows two identifiers in GUID format (for example 3fa85f64-5717-4562-b3fc-2c963f66afa6). Record them using the copy button next to each value:
| On the Azure page | To keep for Bexxo |
|---|---|
| Application (client) ID | Application (Client) ID |
| Directory (tenant) ID | Tenant ID |
4Allow reading of users and groups
Now grant the application the right to read the directory, via Microsoft Graph.
- In the application's left menu, under Manage, open API permissions.
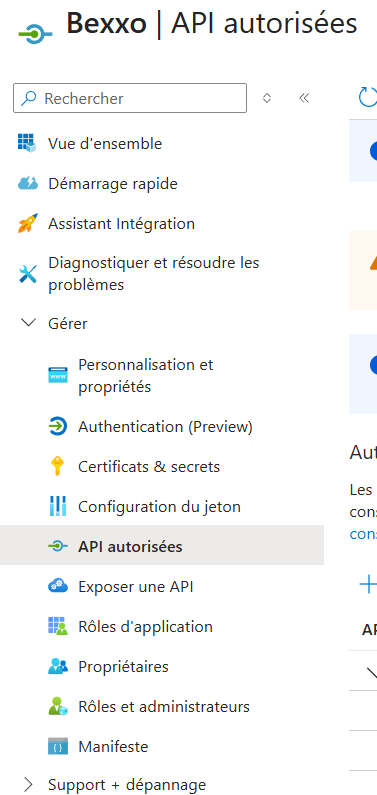
- Click Add a permission, then choose Microsoft Graph.
- Be sure to choose Application permissions (not “Delegated permissions”).
- Search for and add the following two permissions:
| Permission | What it allows |
|---|---|
User.Read.All | Read the list of users (name, email, language, account status…). |
Group.Read.All | Read the groups and the membership of each group. |
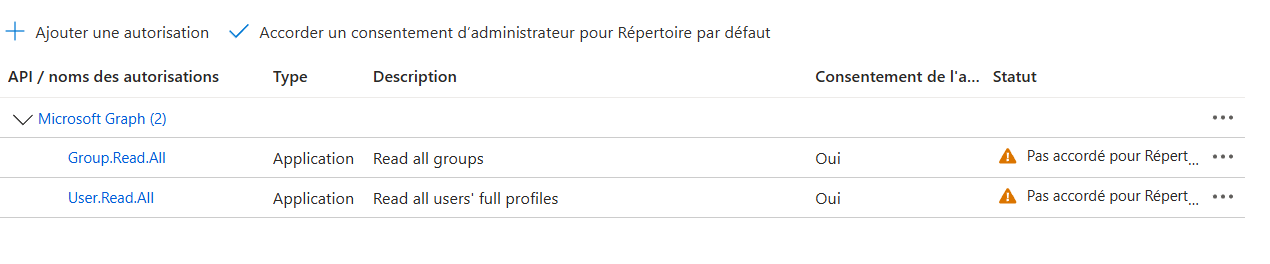
- Click Grant admin consent for [your organisation], then confirm. If needed, click Refresh and check that the status shows “Granted”.

Essential step: as long as the status of the two permissions does not show “Granted”, the synchronisation will fail with a permissions error. Granting admin consent requires a privileged role (see prerequisites).
5Create a client secret
The client secret is the “password” of the application. It is the last technical value to send to Bexxo.
- In the application's left menu, under Manage, open Certificates & secrets.
- Client secrets tab › New client secret.
- Description: for example
Bexxo sync. - Expiration: choose a duration in line with your policy (Microsoft recommends less than 12 months; maximum 24 months) and note the date: the secret must be renewed before it expires.
- Click Add, then immediately copy the secret's Value.
Copy it straight away: copy the Value column, not the “Secret ID” column. The value is displayed in clear text only once; if you leave the page without copying it, you will have to create a new secret.
6Send the information to Bexxo
You now have everything needed. Send Bexxo the information below through a secure channel. Bexxo enters it into the platform, activates the synchronisation and tests the connection.
| Information to send | Where to find it |
|---|---|
| Tenant ID | Step 3 |
| Application (Client) ID | Step 3 |
| Client secret (value) | Step 5 |
| Name of the synchronisation group(s) | Step 1 |
Security: never send the client secret by unencrypted email. Prefer a password-protected share or the secure channel indicated by your Bexxo contact. On the Bexxo side, the secret is encrypted as soon as it is received and is never displayed again.
After go-live
- Manage synchronised people: simply add or remove a member from the group created in step 1. The change is applied at the next synchronisation, with no action on your part.
- Secret renewal: create a new secret (step 5) before the noted expiration date, and send it to Bexxo to avoid any interruption.
- Least privilege: the application only needs
User.Read.AllandGroup.Read.All. Do not add any other permission.
Procedure created from the Microsoft documentation: Register an application with the Microsoft identity platform.
Didn’t find the answer? Contact us